Diy raspberry trellis: types and step-by-step manufacturing instructions
Trellis for growing raspberries - a special support for long stems. The branches do not tangle, they are better illuminated and ventilated, this has a beneficial effect on the yield. You can make a trellis with your own hands. Wooden stakes are easiest to use, but iron welded structures are recommended, which will last longer and are more stable.
Varieties of trellises
There are 2 types of trellises:
- 1-strip;
- 2-way.
The choice of the type of construction depends on the size of the raspberry tree and the type of plant. In any case, the rows are made from 2 to 4, with an interval of about 50 cm.
1-strip trellis
Support slings are pulled from one side / edge of the raspberry tree. Most often these are two or three, less often four wooden or metal stakes, which are driven in along the edge of the planting and between which a string is stretched.
Such a trellis is used in small raspberry bushes, when the bushes are planted in one line and not too dense.
Another disadvantage is that each bush has to be tied separately.
Advice
In order to prepare your raspberries for wintering, it is recommended to use a 1-strip horizontal structure. With its help, it is easier to cover the plant for the winter.
2-way trellis
The design is presented in the form of two rows of wires or strings, which are stretched in parallel and enclose the raspberry tree on both sides.
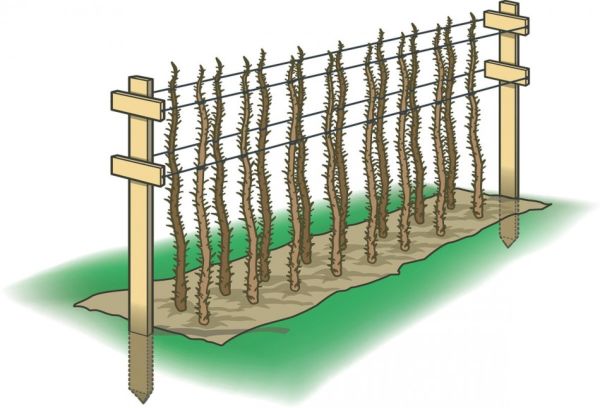
The main advantage of such equipment is that it helps to reduce the density of thickets. Against this background, productivity increases, raspberries are less sick, and it becomes much easier to care for them.
Basic forms
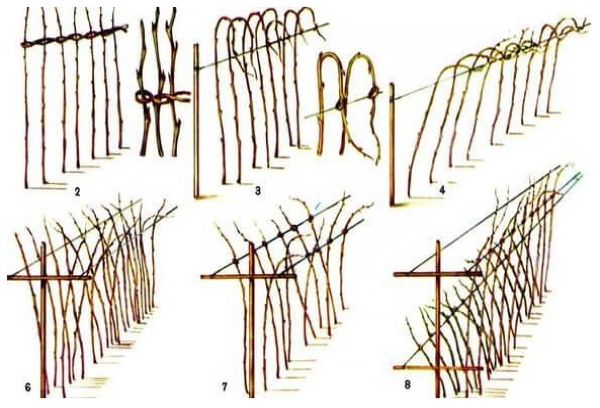
The following forms of trellis are distinguished:
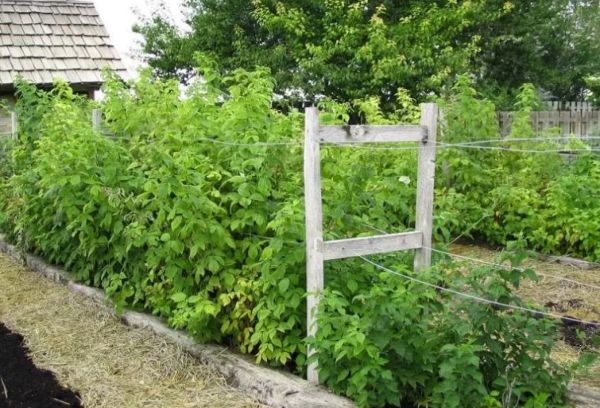
- T-shaped. From both ends of the raspberry tree they put one T-shaped or in the form of a two-row cross support. From support to support, wire, twine or cable is attached to the crossbeams.
- Parallel. In its simplest form, these are four stakes driven into the corners of a raspberry tree and connected by a string in several tiers.
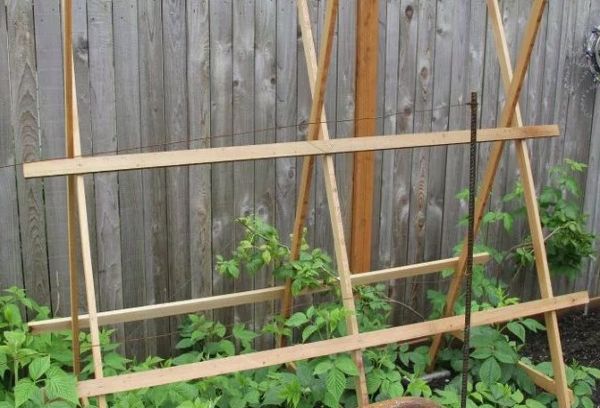
- V-shaped - this is an analogue of a parallel one, the difference is that the stakes are placed at an angle, like the Latin V.
- Y-shaped consists of two spears, which are installed from the ends of the raspberry tree. This allows the shoots to grow vertically from below, and to let them expand at the top.
- Hip horizontal. This design is recommended for use only on large plantations. If the raspberry is small, then the aisles become inaccessible.
Garter methods
Raspberries are tied to all types of trellises in several main ways:
- free, i.e. the stems just lie on the support;
- sequentially, when on each tier a loop is made through which the stem grows;
- braiding, when the stems are brought out beyond the T-shaped trellis and bent around the support sling;
- fanly, when the shoots are fixed on stakes or supporting slings at an average height (over time, the shoots lengthen, but their ends remain at the same level, the stems bend and unfold like a peacock's tail or a fan).
An unusual way is when a furniture stapler is used instead of a string to fix the stems (the bracket clamps the stem, does not pierce). The advantage of the method is speed. The downside is the high risk of injury to the stems and the high cost of the device.
Materials
Beginners usually take wooden stakes or boards as a basis. Professionals prefer more durable fittings.Between the stakes, you can stretch fishing line in several layers, twine, wire, thin hoses from the drip irrigation system.
Important
The support slings should not be too thin - otherwise, on the one hand, they will not be strong enough and tightly stretched, on the other, they will cut into the stems and injure them.
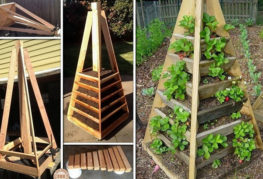
How to build a trellis - instructions
Even a beginner can make a trellis with his own hands, the main thing is to strictly follow the drawing. The most difficult thing is to deepen and fix the supports. It will take physical strength to drive the stakes into the soil or grout to fill the holes.
T-shaped welded trellis
To make a T-shaped trellis, you will need the following tools:
- welding machine;
- Bulgarian;
- roulette;
- a hammer;
- metal pipes (both new and used ones can be used);
- electric drill with a set of drills.
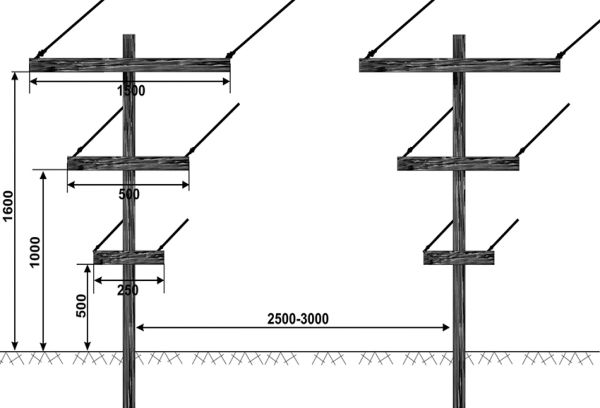
Step-by-step instruction:
- Make blanks - pipes for trellis and 2 crossbeams. The width of the top is 60 cm, the bottom is 50. The optimal distance between the bars is 70 cm. If necessary, you can weld on the intermediate bar. The distance from the ground to the lower crossbar is 55 cm.
- Using a welding machine, weld all the "legs".
- Carry out a little plumbing work - remove all "burrs". Otherwise, your hands could be severely injured.
- Drill small holes on each rung. They will be needed for threading fishing line or twine. The holes must match the diameter of the sling.
- Hammer in both constructions at the beginning and at the end of the raspberry row. The top of the hammered structure should match the top of the bushes. For greater reliability, it is recommended not just to drive in the supports, but to dig holes twice as large in diameter, install them in the centers of the supports and fill them with concrete or fill them with a mixture of sand and crushed stone (both aggregates must be poured / filled up gradually, tamping every second portion).
- Additionally, it is recommended to secure the bottom of the trellis with a cross. The stop helps to avoid rotation of the rack around its axis. It is made with a short tube. If you don't have one at hand, you need to saw it off (the optimal angle is 45 degrees). One end of the stop is welded to the "trunk" of the trellis, and the other is driven into the ground.
- Pull on the slings. You need to pull it as tight as possible.
V-shaped welded trellis
For manufacturing you will need:
- set of pipes;
- jumpers (they should be slightly flattened at the ends in advance);
- a hammer;
- welding machine;
- mask;
- electrodes;
- pulling wire.
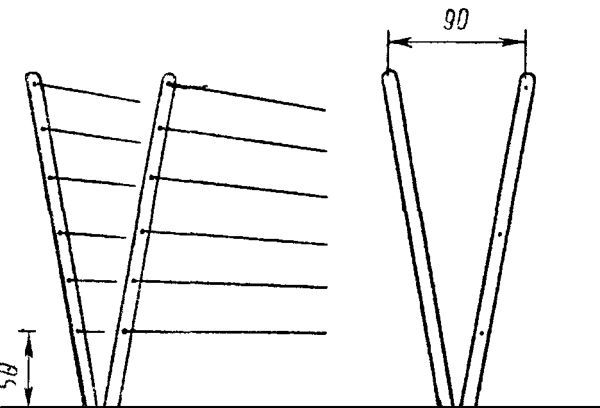
Step-by-step instruction:
- Drill small holes in each pipe (according to the diameter of the slings). The optimum hole size is 3 mm.
- Drive the cut pipes into the ground. They need to be hammered not directly, but at an angle.
- Weld the jumpers. They are necessary in order to keep the structure from falling apart. The pipe joints should not be overlapped, but butt welded.
- Weld on the support. You need to act in exactly the same way as in the first method. The support helps prevent the structure from falling when the wire is pulled.
If the row length is more than 15 meters, then three such structures will be required. For the middle structure, which is in the center of the row, it is not necessary to make a support.
The next step is threading the wire.
Tapestry for remontant varieties
A 2-way design is recommended. At the same time, one of the planes serves as a fixer for two-year-old shoots, the second helps to grow young shoots, which are just preparing for fruiting.
Important nuances
Key points to keep in mind:
- Wood trellis is susceptible to decay and deformation under the influence of the atmosphere and precipitation. The ends of wooden blocks must be well tarred or treated with a special compound. The optimal diameter for the posts is 15 cm.
- It is recommended to stretch the wire in at least 2 rows. If the fence is installed in a limited area, then it is permissible to use a reinforced twine. In this case, the distance should be minimal.
- If possible, a raspberry trellis can be purchased at a specialized store. The cost of the construction varies from 3000 to 12000 rubles.
The trellis helps to "unfold" the crimson thickets, raise the shoots from the ground and protect them from fractures under gusts of wind or a layer of snow. It is pleasant and convenient to care for such a planting, as well as to harvest from it. Children will especially appreciate the V-shaped trellis, who will have a maze full of sweet berries ready.


and will be published shortly.